Note
This documentation is for the new OMERO 5.3 version. See the latest OMERO 5.2.x version or the previous versions page to find documentation for the OMERO version you are using if you have not upgraded yet.
Taskbar
Note
With the release of OMERO 5.3.0, the OMERO.insight desktop client has entered maintenance mode, meaning it will only be updated if a major bug is discovered. Instead, the OME team will be focusing on developing the web clients. As a result, coding against this client is no longer recommended.
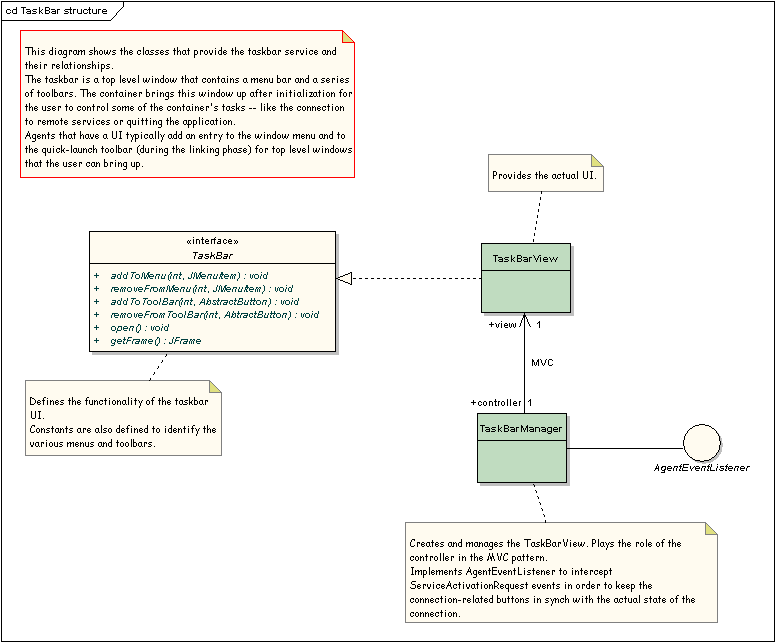
The container provides a top-level window, the taskbar, to let users control some of the container’s tasks like the connection to the remote service or quitting the application. The taskbar contains a menu bar and several toolbars. Agents can add their own entries to the menu bar and to the toolbars in order to trigger agent-specific actions, or can ignore the taskbar altogether. For example, agents that are UIs typically add an entry to the Window menu and to the Quick-launch toolbar (this should be done during the agent’s linking phase) for top-level windows that the user can bring up. Some utility classes provide agents with functionality to link their top-level windows to the taskbar and to manage the display of those windows on screen.
Structure and dynamics
The following diagram shows the classes that provide the taskbar service and their relationships:

Taskbar structure
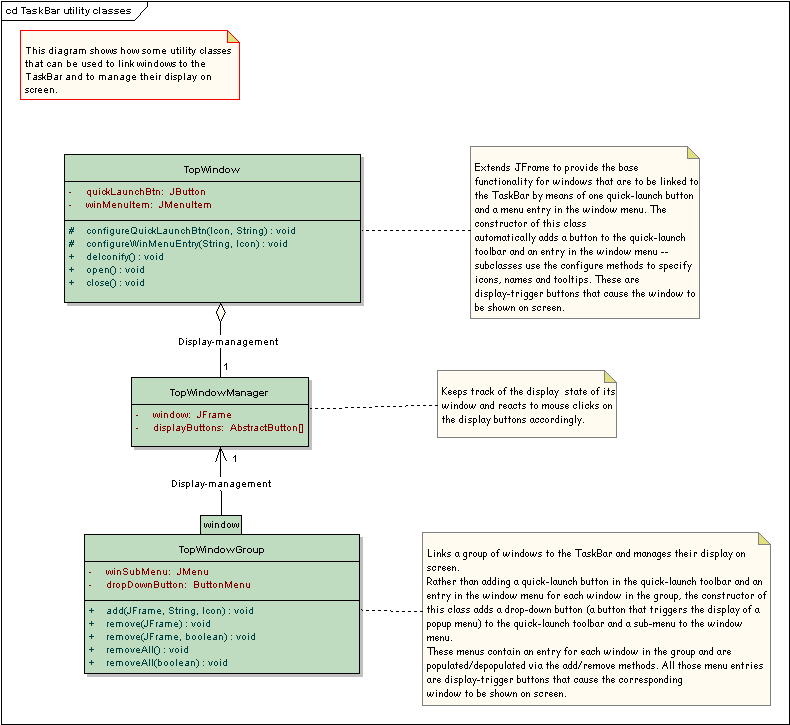
The following diagram shows how some utility classes that can be used to link windows to the TaskBar and to manage their display on screen:

Taskbar utility classes
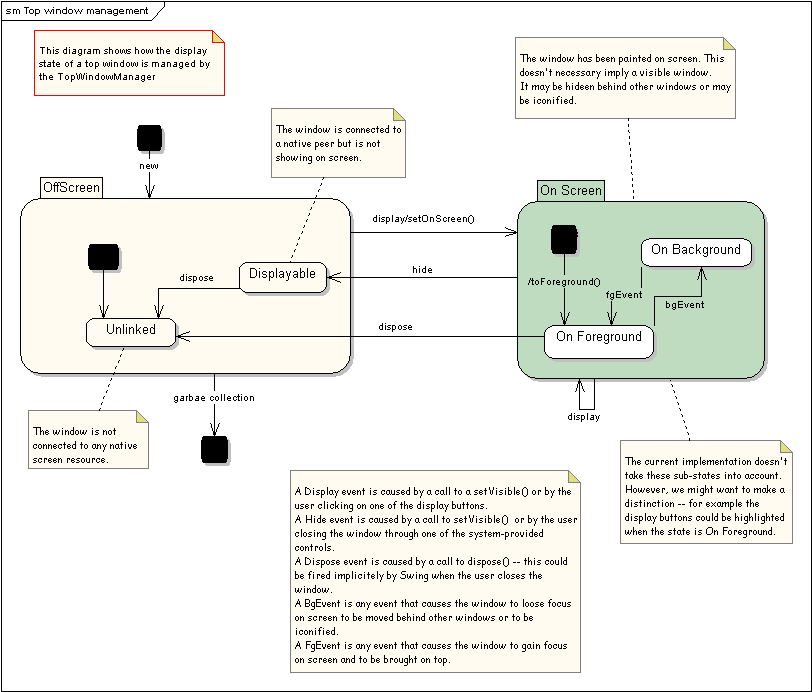
The following diagram shows how the display state of a top window is managed by the TopWindowManager:

Taskbar window management
How to
Agents can use the taskbar directly to add entries to the various menus and toolbars. After retrieving the TaskBar from the Registry, the addXXX and removeXXX are available to do the job.
Agents can add entries to any of the menus within the menu bar – File, Connect, Tasks, Window, Help. Two toolbars, Tasks and Quick-Launch, are also provided for agents to plug in their buttons. Buttons in the Tasks toolbar are usually shortcuts to entries in the Tasks menu. Similarly, buttons in the Quick-Launch toolbar are usually shortcuts to entries in the Window menu.
However, some utility classes provide agents with built-in functionality to link their top-level windows to the taskbar and to manage the display of those windows on screen.
The TopWindow class extends JFrame to provide the base functionality for windows that are to be linked to the TaskBar by means of one quick-launch button and a menu entry in the Window menu. The constructor of this class automatically adds a button to the Quick-Launch toolbar and an entry in the Window menu – subclasses use the configureXXX methods to specify icons, names, and tool tips. These are display-trigger buttons that cause the window to be shown on screen. This class uses the TopWindowManager to control mouse clicks on these buttons as well as to manage the display state of the window – how this display state is managed is specified by the TopWindowManager state machine, which is represented in one of the previous diagrams.
Here is an example of a window that inherits from TopWindow:
class MainWindow
    extends TopWindow
{
    //Member fields omitted.

    //Specifies names, icons, and tool tips for the quick-launch button and the
    //window menu entry in the taskbar.
    private void configureDisplayButtons()
    {
        configureQuickLaunchBtn(icons.getIcon("agent.png"),
                             "Display the main window.");
        configureWinMenuEntry("Example Agent", icons.getIcon("agent.png"));
    }

    //Builds and lays out this window.
    private void buildGUI() { /* Omitted. */ }


    //Creates a new instance.
    MainWindow(Registry config)
    {
        //We have to specify the title of the window to the superclass
        //constructor and pass a reference to the TaskBar, which we get
        //from the Registry.
        super("Example Agent", config.getTaskBar());

            configureDisplayButtons();
            buildGUI();
    }

}
The TopWindowGroup class links a group of windows to the TaskBar and manages their display on screen. Rather than adding a quick-launch button in the Quick-Launch toolbar and an entry in the window menu for each window in the group, the constructor of this class adds a drop-down button (a button that triggers the display of a popup menu) to the Quick-Launch toolbar and a sub-menu to the Window menu. These menus contain an entry for each window in the group and are populated/depopulated via the add/remove methods. All those menu entries are display-trigger buttons that cause the corresponding window to be shown on screen. This class uses the TopWindowManager to control mouse clicks on these buttons as well as to manage the display state of each window in the group.
The following UIManager class provides an example of how to use the TopWindowGroup class. This example class creates and controls an instance of MainWindow (which we have already seen in the previous example) as well as AuxiliaryWindow instances. This latter class is just a window which contains two buttons and its code is omitted. UIManager delegates to the TopWindowGroup class the linkage of AuxiliaryWindow‘s to the TaskBar as well as the management of their display state.
Follows the code:
class UIManager
{

    //Inherits from TopWindow, so it is automatically linked to the TaskBar.
    //Contains a button that we listen to.  When a mouse click occurs we call
    //createAuxWin().
    private MainWindow      mainWindow;

    //Manages all the AuxiliaryWindow's that we have created and not destroyed yet.
    private TopWindowGroup      auxWinGroup;

    //Counts how many {@link AuxiliaryWindow}'s that we have created so far.
    private int         auxWinCount;

    //Cached reference to access the icons.
    private IconFactory     icons;


    //Creates a new instance.
    UIManager(Registry config)
    {

        auxWinCount = 0;
        icons = (IconFactory) config.lookup("/resources/icons/MyFactory");
        mainWindow = new MainWindow(config);

        //The MainWindow contains a button (not shown in the previous example)
        //which we listen to in order to trigger the creation of new
        //AuxiliaryWindow’s.
        mainWindow.openAuxiliary.addActionListener(new ActionListener() {
            public void actionPerformed(ActionEvent ae) { createAuxWin(); }
        });


        //We now create the window group.  The text we pass will be displayed by
        //the sub-menu within the Window menu along with the icon, which will also
        //be the icon displayed by the drop-down button in the Quick-Launch
        //toolbar.
        auxWinGroup = new TopWindowGroup("Aux Win",
                    icons.getIcon("edu_languages.png"),
                    config.getTaskBar());

    }

    //Creates an AuxiliaryWindow and adds it to the auxWinGroup.
    //Every AuxiliaryWindow contains two buttons, one labeled "Close" and the other
    //"Dispose".  We listen to mouse clicks on these buttons in order to hide the
    //window when the "Close" button is clicked and to remove the window (and dispose
    //of it) from the auxWinGroup when the "Dispose" button is clicked.
    private void createAuxWin()
    {
        String title = "Aux Window "+(++auxWinCount);
        final AuxiliaryWindow aw = new AuxiliaryWindow(title);

        //Attach listeners and specify actions.
        aw.close.addActionListener(new ActionListener() {
            public void actionPerformed(ActionEvent ae) {aw.setVisible(false);}
        });
        aw.dispose.addActionListener(new ActionListener() {
            public void actionPerformed(ActionEvent e) {
                //Remove from group and dispose.
                auxWinGroup.remove(aw, true);
            }
        });

        //Add to the group.  An entry will be added both to the Window sub-menu
        //and to the popup menu triggered by the drop-down button in the
        //Quick-Launch toolbar.  We set the display text of those entries to be
        //the same as the window's title, but we don't specify any icon.
        auxWinGroup.add(aw, title, null);

        //Bring the window up.
        aw.open();
    }

    //Releases all UI resources currently in use and returns them to the OS.
    void disposeUI()
    {
        mainWindow.dispose();
        auxWinGroup.removeAll(true);  //Empty group and dispose of all windows.
    }

}