Note
This documentation is for OMERO 5.2. This version is now in maintenance mode and will only be updated in the event of critical bugs or security concerns. OMERO 5.3 is expected in the first quarter of 2017.
Troubleshooting OMERO virtual appliance
Networking not working
Occasionally, during the boot process, the VirtualBox DHCP server fails to allocate an IP address to the OS in the guest VM. This means that OMERO.clients, such as OMERO.insight, cannot connect to the OMERO.server in the VM.
CAUSE: We believe that this is an intermittent VirtualBox bug that resurfaces across many versions VirtualBox #4038 and previously VirtualBox #3655
DIAGNOSIS: Check whether the guest VM has been allocated the reserved host-only NAT IP address. If 10.0.2.15 does not appear in the output from ifconfig then this issue has occurred. The easiest way to verify this is to log into the guest VM console and check the output from executing the following command:
$ ifconfig
SOLUTION: An easy, but unreliable, fix is to reboot the guest VM. The preferred fix is to log into the guest VM console and execute the following commands, which will cause the guest OS to release its IP lease before requesting a new lease:
$ dhclient -r
$ dhclient -eth0
Port conflict when OMERO.server already running in Host OS
If you are already running an instance of the OMERO.server in your host OS then there will be a conflict due to the ports assigned to VirtualBox port-forwarding already being in use.
SOLUTION 1: Turn off the OMERO.server in the host environment by issuing the following command:
$ omero admin stop
SOLUTION 2: Alter the port-forwarding settings for your OMERO.VM as described in the Port-forwarding settings section. For example, increment the host port settings for omero-ssl, omero-unsec, and omero-web.
Note
We are assuming that your host OS is not already running services on those ports. You can check whether something is already listening on any of these ports by running the following commands (Mac OS X) which should return the prompt without any further output if there is nothing listening:
$ lsof -nP | grep -E '(:4063)|(:4064)'
Slow import speed due to low memory allocation
By default, the base memory of the VM is set to 1024 MB to allow it to run on any machine. However, this is likely to result in very poor import performance such that increasing the memory allocation to 2048 MB should result in import speeds being improved by a factor of 3-4 times.
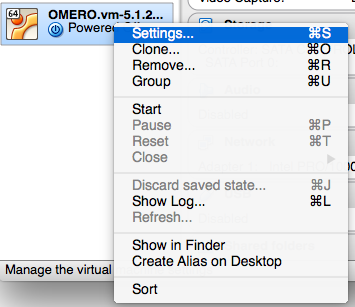
To increase the base memory allocation, right-click on the OMERO virtual appliance in Virtual Box and select Settings:
Then go to the System tab:
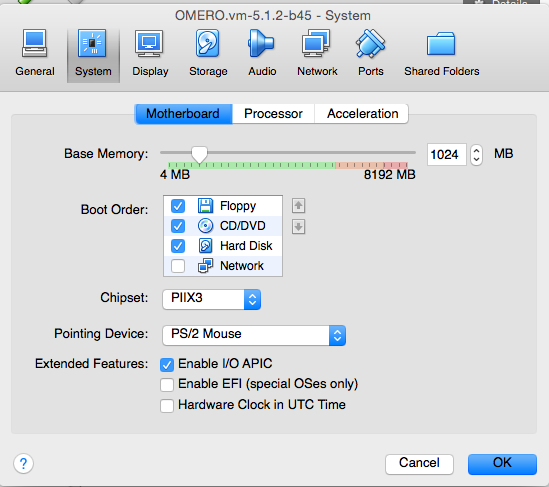
Increase the Base Memory by typing into the text box:

If your VM is already running, you will need to restart it for this change to take effect.
Alternatively, you can use the command line:
VBoxManage modifyvm OMERO.vm-5.2.8-bxx --memory 2048
VM will not boot because the HDD is full
If you fill the virtual HDD used by your VM then the OS may be unable to boot and you will lose access to your OMERO.server install. You may also get a “error 28: no space left on device” message. To log into your VM you will need to use the recovery mode. Start the VM and at the Grub screen, use the down arrow followed by return to select the recovery mode entry, e.g.
Debian GNU/Linux, with Linux 2.6.32-5-686 (recovery mode)
as illustrated in this example of the Grub screen:
                 GNU GRUB  version 1.98+20100804-14
┌────────────────────────────────────────────────────────────────────────┐
│Debian GNU/Linux, with Linux 2.6.32-5-686                               │
│Debian GNU/Linux, with Linux 2.6.32-5-686 (recovery mode)               │
│                                                                        │
│                                                                        │
│                                                                        │
│                                                                        │
│                                                                        │
│                                                                        │
│                                                                        │
│                                                                        │
│                                                                        │
│                                                                        │
│                                                                        │
└────────────────────────────────────────────────────────────────────────┘
Do not worry if your VM has a kernel number different to 2.6.32-5-686, the important thing is that you select the entry labeled “recovery mode”. At this point, the VM should rapidly boot into the recovery mode and enable you to log in as the omero user. Administrative commands may be run as root by using sudo.
Once you have logged in, you have a number of options but the recommended courses of action are:
- Delete unnecessary files using standard Linux command line tools like rm to make space for the VM to boot normally, then use your favored OMERO client to login and delete more files. A useful place to start might be by deleting the logs stored in /var/logs.
- Increase the size of your virtual HDD. If you have filled your existing HDD then it is likely that the volume of data you are storing is too big for the default HDD. You should use the instructions in the Increasing HD size section following to ensure that the size of virtual HDD you have available is suitable for the volumes of data that you are collecting.
Increasing HD size
Image data can become very large and easily fill available hard-drive space. By default, the OMERO virtual appliance is supplied with a 30GB virtual hard-drive. Before using the appliance, consider the volume of data you will be working with whilst evaluating OMERO and whether you need to increase the size of the virtual hard-drive to accommodate it.
The following is a step-by-step guide; be aware that this is not a risk-free procedure and you should backup your VM before proceeding.
Preliminary steps
Acquiring a Ubuntu Linux ISO
Download an Ubuntu Linux ISO. The most up-to-date version is fine.
Backing up your VM
Before you proceed further, you should create a clone of the omero-vm and subsequently work on the copy so that if something gets broken you can always start again. The easiest way to do this is from the command line.
Note
If you are on Windows then you should navigate to C:\Program Files\Oracle\VirtualBox\ because the VBoxManage tools are not added to your path by default.
Start a shell and, assuming that your VM has the default name of omero-vm, use the following command:
$ VBoxManage clonevm omero-vm --mode machine --options keepallmacs --name omero-vm-2 --register
This will create a copy of your VM called omero-vm-2 which you can make alterations to. This means that you can always return to the original omero-vm if you break anything. From now on only make changes to omero-vm-2.
Extending the HDD
By default, your virtual hard-drive attached to omero-vm-2 is of a type which cannot be extended; so you need to change this by cloning your HDD from the VDMK type to VDI type:
$ VBoxManage clonehd omero-vm-2-disk1.vmdk omero-vm-2-disk1.vdi --format VDI
You now need to increase the size of your virtual HDD. The following command resizes the HDD to 60GB but you should select a size to suit the amount of data you plan to store in OMERO:
$ VBoxManage modifyhd omero-vm-2-disk1.vdi --resize 60000
Adding the extended HDD to the VM clone
You now need to tell VirtualBox to use omero-vm-2-disk1.vdi instead of omero-vm-2-disk1.vmdk which is currently attached to the VM. Whilst you are on the Storage tab you will also attach the Ubuntu ISO that you downloaded earlier to your VM. This will allow you to use the tools that ship with Ubuntu to make changes to the filesystem within your VM.
- Start VirtualBox and select omero-vm-2 in the VM library.
- Right-click Settings then select the Storage tab.
- Right-click on omero-vm-2-disk1.vmdk and select Remove attachment.
- Next to the SATA Controller entry, click the Add Hard Disk icon with a green plus sign. In the pop-up dialog, select Choose existing disk. Now navigate to the location where VirtualBox stores your virtual machines and enter the omero-vm-2 directory. Select the omero-vm-2 disk1.vdi and click open.
- Add an IDE Controller using the Add Controller icon. Select this new controller then click Add CD/DVD device followed by Choose Disk. Navigate to the location of your Ubuntu ISO, select it and click OK.
The storage for your OMERO VM should now look similar to Virtual Appliance storage settings.
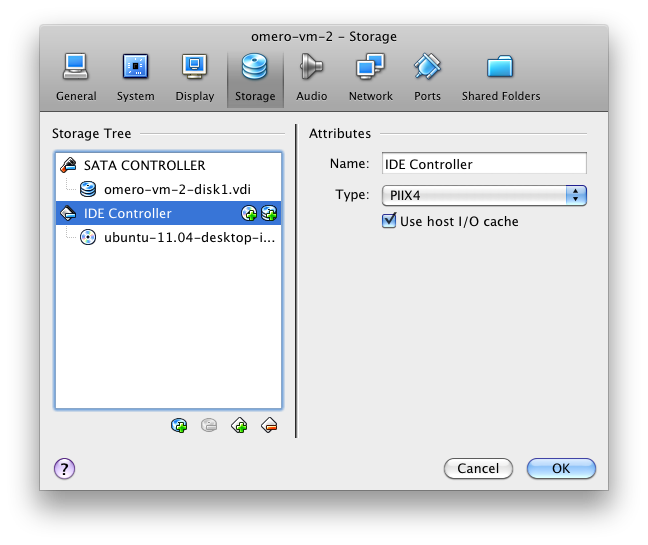
Virtual Appliance storage settings
Click OK to return to the VirtualBox VM library. With omero-vm-2 selected, ensure that the storage details match what you expect, e.g. omero-vm-2-disk1.vdi is connected to your SATA Port 0. The size for this disk should also more or less match what you specified earlier with the VBoxManage modifyhd command. The reported numbers do not exactly matchup, e.g. a virtualised HDD of 60GB size will be reported as 58.59GB.
Reallocating space on the VA HDD
Start the omero-vm-2 VM. Ubuntu linux should boot and you should eventually see a welcome screen giving you the option to try Ubuntu or to install it. You can now start the GParted software and resize your partitions.
- Select try Ubuntu and you should be presented with a graphical desktop.
- Start the gparted tool using the menu option under System ‣ Administration ‣ GParted Partition Editor.
- The GParted GUI will display information similar to Virtual Appliance HDD in GParted.
- Right-click the entry for /dev/sda5 and select Swapoff.
- Right click on /dev/sda5 and click Delete to remove the swap partition.
- Delete /dev/sda2 in the same way. This should leave two entries, one for /dev/sda1 and one for unallocated space.
- Right-click /dev/sda1 and select Resize. Now drag the right arrow to the right until the entry for Free space following (MiB) is about 2000, then click Resize/Move.
- Right click the entry for unallocated space and select New from the pop-up menu. Select linux-swap from the File system drop-down menu then Add.
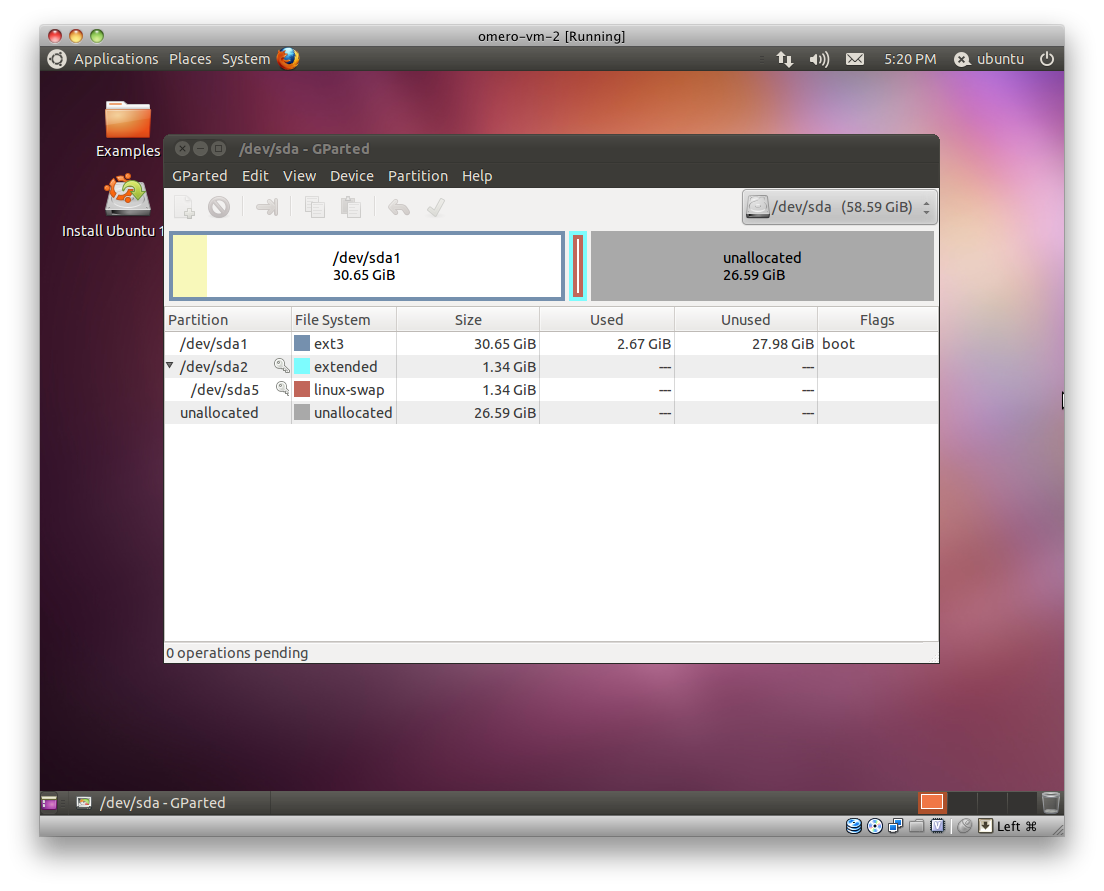
Virtual Appliance HDD in GParted
Up until this point you have not actually applied any of your changes to the HDD, you have only specified a list of changes that should be made. You can now go ahead and apply them by selecting the Edit ‣ Apply All Operations menu item, then clicking Apply in the confirmation dialog box.
When the operations have completed, dismiss the dialog with the Close button, close GParted, then shutdown the VM.
Changing HDD settings inside the VA
You no longer need the Ubuntu ISO so you can detach it from your VM. Ensure that omero-vm-2 is selected then click Settings and select the Storage tab. Right-click the IDE Controller entry and select Remove Controller, then click OK to return the VirtualBox VM library.
Start the omero-vm-2 VM and allow it to boot. As root then issue the df -h command. Verify that the size of the /dev/sda1 is approximately what you expect, e.g. if you allocated a 60GB virtual HDD then after size conversions and swap allocation you should end up with /dev/sda1 reported as being around 56GB.
Within the VM you need to add the UUID of the new swap partition to the /etc/fstab file because you deleted the old one and created a new swap meaning that the IDs will no longer match.
$ vim /etc/fstab
Move your cursor to the entry that looks similar to the following:
UUID=SOME-LONG-ALPHA-NUMERIC-STRING none swap sw 0 0
then press i to enter “insert mode”. Delete the alphanumeric string so that the entry looks similar to the following:
UUID= none swap sw 0 0
and place your cursor after the equals sign. You can now issue a command from within the VIM editor to insert your new swap UUID into the fstab file.
[Insert Mode] <CTRL-R> =system('/sbin/blkid -t TYPE=swap | cut -c18-53') <return>
Save your file and quit VIM:
[Command Mode] :wq <return>
Now reboot your VM with
$ shutdown -r now
Once your VM has rebooted you should now have a working VM with a larger virtual HDD.