OMERO.web framework
MOVIE introduction to OmeroWeb
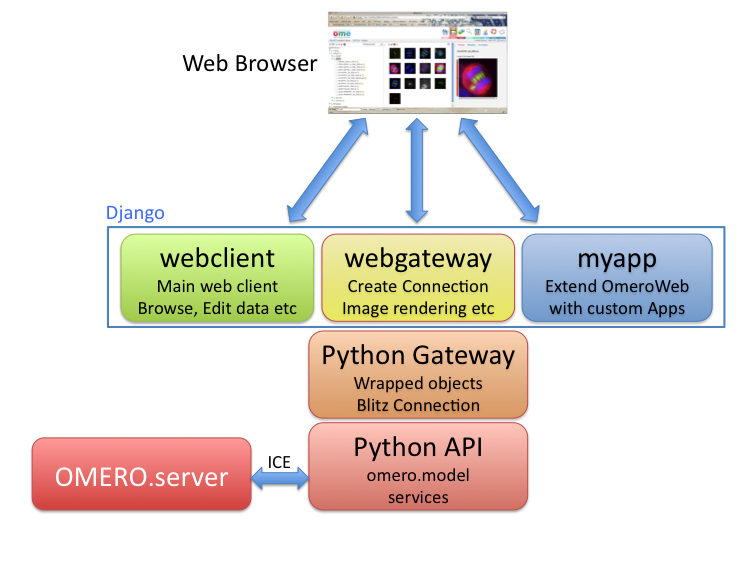
OMERO.web is a framework for building web applications for OMERO. It uses Django to generate html pages from data retrieved from the OMERO server. OMERO.web acts as a Python client of the OMERO server using the OMERO API, as well as being a web server itself (see ‘infrastructure’ info below). It uses Django ‘apps’ to provide modular web tools, such as the webclient (working with image data) and webadmin (administrator management). This modular framework makes it possible to extend OMERO.web with your own apps.
One of the apps, WebGateway, provides utility methods for accessing data and rendering images, as well as handling the connection to OMERO server.
OMERO.web infrastructure
OMERO Python API
The OMERO.web framework is all based on the OMERO Python API, using the Blitz Gateway (see OMERO Python language bindings). The OMERO.web framework provides functionality for creating and retrieving connections to OMERO (see example below & Writing OMERO.web views for more details)
Web gateway
The webgateway is a Django app that provides utility functionality for the other web components. This includes a full image viewer, as well as methods for rendering images etc. You can browse the webgateway urls, or see the WebGateway page for more info.
Web apps
The OMERO.web framework consists of several Django apps denoted by folders named ‘web....’. These include webgateway & webtest, as discussed above, as well as released tools (webadmin, webclient) and other apps in development:
- webclient: Main web client for viewing images, annotating etc. More information available under OMERO.web.
- webadmin: For administration of user and group settings.
- webgateway: A web services interface, providing rendered images and data. See WebGateway.
- webtest: A sample app for testing, that can also be used as a basis for creating your own app.
Getting started
All your development should be in a new ‘app’. Django apps provide a nice way for you to keep all your code in one place and make it much easier to port your app to new OMERO releases or share it with other users. To get started, see Creating an app. But if you want to have a quick look at some example code, see below...
Quick example - webtest
This tiny example gives you a feel for how the OMERO.web framework gets data from OMERO and displays it on a web page. You can find this and other examples in the ‘webtest’ app. Also, see the OMERO.web demo movie.
Note
Some details of this code have changed in the OMERO 4.4 release - see below.
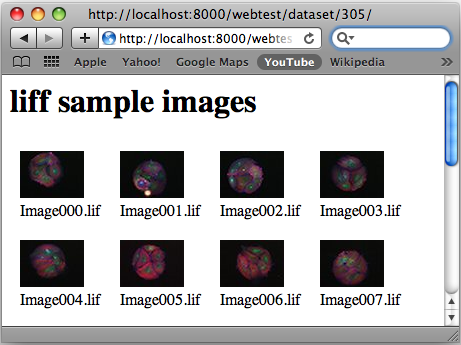
There are 3 parts to each page: url, view and template. For example, this code below is for generating an html page of a Dataset (see screen-shot). If you have OMERO.web running, you can view the page under http://servername.example.org/webtest/dataset/<datasetId>.
Url goes in omeroweb/webtest/urls.py This maps the url ‘webtest/dataset/<datasetId>/’ to the View function ‘dataset’, passing it the datasetId.
url( r'^dataset/(?P<datasetId>[0-9]+)/$', views.dataset ),
View function, in omeroweb/webtest/views.py. NB: @login_required decorator retrieves connection to OMERO as ‘conn’ passed in args to method. See Writing OMERO.web views for more details.
from omeroweb.webclient.decorators import login_required
# handles login (or redirects). Was @isUserConnected before OMERO 4.4
@login_required()
def dataset(request, datasetId, conn=None, **kwargs):
    ds = conn.getObject("Dataset", datasetId)
    # generate html from template
    return render_to_response('webtest/dataset.html', {'dataset': ds})
Template: The template web page, in omeroweb/webtest/templates/webtest/dataset.html
<html><body>

<h1>{{ dataset.getName }}</h1>

{% for i in dataset.listChildren %}
    <div style="float:left; padding:10px">
        <img src="{% url webgateway.views.render_thumbnail i.id %}" />
        <br />
        {{ i.getName }}
    </div>
{% endfor %}

</body></html>
Next: Get started by Creating an app....