Using Bio-Formats to load images into ImageJ
This section will explain how to use Bio-Formats to import files into ImageJ and how to use the settings on the Bio-Formats Import Options screen.
Opening files
There are three ways you can open a file using Bio-Formats:
Select the Bio-Formats Importer under the Bio-Formats plugins menu.
Drag and drop it onto the Bio-Formats Plugins Shortcut window.
Use the Open command in the File menu.
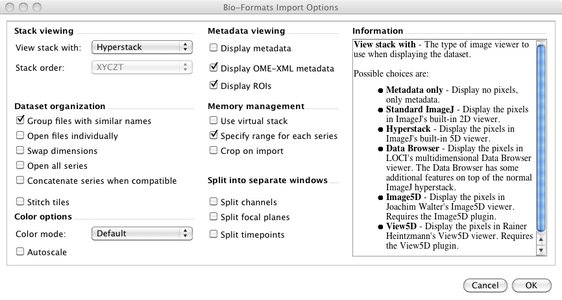
Unless you used the Bio-Formats Plugins Configuration dialog to open the file type windowlessly, you know you used Bio-Formats to open a file when you see a screen like this:
If you used the File > Open command and did not see the Bio-Formats Import Options screen, ImageJ/Fiji probably used another plugin instead of Bio-Formats to open the file. If this happens and you want to open a file using Bio-Formats, use one of the other two methods instead.
Opening files windowlessly
When you open a file with Bio-Formats, the Import Options Screen automatically recalls the settings you last used to open a file with that specific format (e.g. JPG, TIF, LSM, etc.). If you always choose the same options whenever you open files in a specific file format, you can save yourself time by bypassing the Bio-Formats Import Options screen. You can accomplish this two ways:
1. You can select the Bio-Formats Windowless Importer, located in the Bio-Formats menu under ImageJ’s Plugin menu. When you select this option, Bio-Formats will import the file using the same settings you used the last time you imported a file with the same format.
2. If you invariably use the same settings when you open files in a specific format, you can always bypass the Import Options Screen by changing the settings in the Bio-Formats Plugins Configuration option, which is also located in the Bio-Formats menu under ImageJ’s Plugin menu.
Once you select this option, select the file format you are interested in from the list on the left side of the screen. Check both the Enabled and Windowless boxes. Once you do this, whenever you open a file using the Bio-Formats Windowless Importer,the Bio-Formats Importer, or the drag-and-drop method described in the previous section, the file will always open the same way using the last setting used.
Please note that if you want to change any of the import settings once you enable this windowless option, you will have to go back to the Bio-Formats Plugins Configuration screen, unselect the windowless option, open a file using the regular Bio-Formats Importer, select your settings, and re-select the windowless option.
Group files with similar names
Note
The functionality described below is also available outside ImageJ, by using a pattern file to tell Bio-Formats how to group the files. See Grouping files using a pattern file for more information.
One of the most important features of Bio-Formats is to combine multiple files from a data set into one coherent, multi-dimensional image.
To demonstrate how to use the Group files with similar names feature, you can use the dub data set available under LOCI’s Sample Data page. You will notice that it is a large dataset: each of the 85 files shows the specimen at 33 optical sections along the z-plane at a specific time.
If you open just one file in ImageJ/Fiji using the Bio-Formats Importer, you will get an image incorporating three dimensions (x, y, z). However, if you select Group files with similar names from the Bio-Formats Import Options screen, you will be able to create a 4-D image (x, y, z, and t) incorporating the 85 files.
After clicking OK, you will see a screen like this:
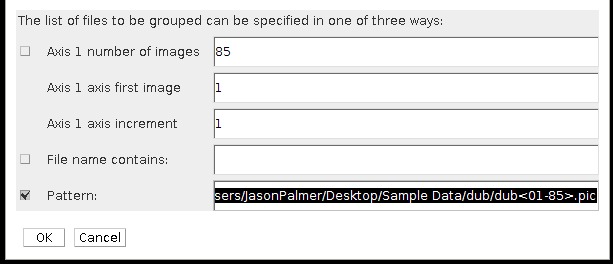
This screen allows you to select which files within the 85-file cluster to use to create that 4-D image. Some information will be pre-populated in the fields. Unless you want to change the settings in that field, there is no need to change or delete it. If you click OK at this point, you will load all 85 files.
However, you can specify which files you want to open by adjusting the “axis information”, the file “name contains”, or the “pattern” sections. Even though there are three options, you only need to need to make changes to one of them. Since Bio-Format’s precedence for processing data is from top to bottom, only the uppermost section that you made changes to will be used. If you change multiple boxes, any information you enter into lower boxes will be ignored.
To return to the example involving the dub data set, suppose you want to open the first image and only every fifth image afterwards (i.e. dub01, dub06, dub11 … dub81). This would give you 17 images. There are different ways to accomplish this:
You can use the Axis Settings only when your files are numbered in sequential order and you want to open only a subset of the files that have similar names. Since the dub data set is numbered sequentially, you can use this feature.
Axis 1 number of images refers to the total number of images you want to open. Since you want to view 17 images, enter 17. Axis 1 axis first image specifies which image in the set you want to be the first. Since you want to start with dub01, enter 1 in that box. You also want to view only every fifth image, so enter 5 in the Axis 1 axis increment box.
The File name contains box should be used if all of the files that you want to open have common text. This is especially useful when the files are not numbered. For example, if you have “Image_Red.tif”, “Image_Green.tif”, and “Image_Blue.tif” you could enter “Image_” in the box to group them all.
To continue the example involving the dub data set, you cannot use the file name contains box to open every fifth image. However, if you only wanted to open dub10 thorough dub19, you could enter “dub1” in the file name contains box.
The pattern box can be used to do either of the options listed above or much more. This box can accept a single file name like “dub01.pic”. It can also contain a pattern that use “<” and “>” to specify what numbers or text the file names contain.
There are three basic forms to the “< >” blocks:
Text enumeration - “Image_<Red,Green,Blue>.tif” is the pattern for Image_Red.tif, Image_Green.tif, Image_Blue.tif. (Note that the order you in which you enter the file names is the order in which they will be loaded.)
Number range - “dub<1-85>.pic” is the pattern for “dub1.pic”, “dub2.pic”, “dub3.pic” … “dub85.pic”.
Number range with step - “dub<1-85:5>.pic” is the pattern for “dub1.pic”, “dub6.pic”, “dub11.pic”, “dub11.pic” … “dub85.pic”.
It can also accept a Java regular expression.
Autoscale
Autoscale helps increase the brightness and contrast of an image by adjusting the range of light intensity within an image to match the range of possible display values. Note that Autoscale does not change your data. It just changes how it is displayed.
Each pixel in an image has a numerical value ascribed to it to describe its intensity. The bit depth—the number of possible values– depends on the number of bits used in the image. Eight bits, for example, gives 256 values to express intensity where 0 is completely black, 255 is completely white, and 1 through 254 display increasingly lighter shades of grey.
ImageJ can collect the intensity information about each pixel from an image or stack and create a histogram (you can see it by selecting Histogram under the Analyze menu). Here is the histogram of a one particular image:
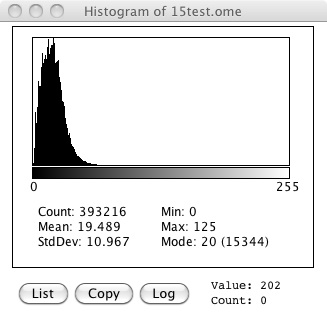
Notice that the histogram heavily skews left. Even though there are 256 possible values, only 0 thorough 125 are being used.
Autoscale adjusts the image so the smallest and largest number in that image or stack’s histogram become the darkest and brightest settings. For this image, pixels with the intensity of 125 will be displayed in pure white. The other values will be adjusted too to help show contrast between values that were too insignificant to see before.
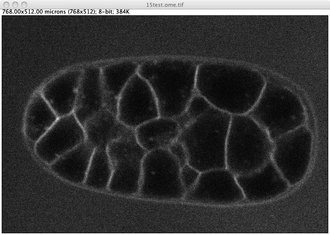
Here is one image Bio-Formats imported with and without using Autoscale:
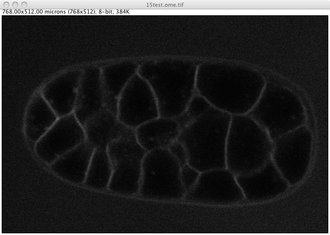
Autoscale readjusts the image based on the highest value in the entire data set. This means if the highest value in your dataset is close to maximum display value, Autoscale’s adjusting may be undetectable to the eye.
ImageJ/Fiji also has its own tools for adjusting the image, which are available by selecting Brightness/Contrast, which is under the Adjust option in the Image menu.